I. Introduction
A press brake tool is a machine tool used in metal forming to bend and shape metal sheets. These machines are widely utilized in industries such as construction, automobile, aerospace, and others involved in sheet metal processing and manufacturing.
However, the key to achieving high-quality and efficient bending lies not only in the machine’s performance but also in the tools it uses—press brake tools. These tools are the heart of precise bending, directly impacting the accuracy of the formed workpieces, processing flexibility, and overall productivity.
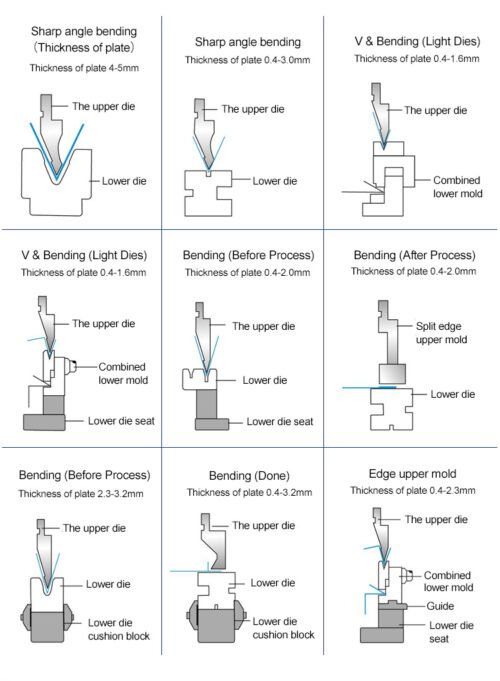
The press brake tool is comprised of two parts: the upper die (punch) and the lower die. The combination of these two dies, with their different shapes, acts upon the plate to form workpieces of various shapes.
II. Overview of Press Brake Tools and Accessories
1.The Components of Press Brake Tooling
Press brake tooling is divided into upper tools (punches) and lower tools (dies).
Each type has specific structural components that determine its performance, accuracy, and application.
1.1 Press Brake Punches (Upper Tools)
the punch is the upper part that fits into the press brake ram (clamping).it come in various specialized shapes—such as standard, acute-angle, gooseneck, or radius-top designs—to accommodate specific bending requirements. A copmlete punch system is consists of punch,clamping and punch shoulder
The clamping system:Holds the punch tightly so it cannot fall or move.Aligns the punch perfectly with the die.Allows quick tool changes (depending on clamping type).Provides safety during high-tonnage bending.Without proper clamping, the punch may slip → dangerous and inaccurate.the types have Manual (Mechanical) Clamping,Quick-Release Clamping,Pneumatic Clamping and Hydraulic Clamping
1.2 Press Brake Dies (Lower Tools)
Conversely, the lower die work as a fixed base, supporting the workpiece and defining its final geometry. Its cavity shape (typically V-shaped, U-shaped, or grooved) determines the bending radius and angle. For example, V-shaped dies use the “figure-eight rule” to determine the relationship between their opening width and material thickness, thus balancing precision and flexibility.A copmlete die system is consists of Die Holder (Die Base),Guide Rails and Positioning Devices
Die Holder (Die Base):The die holder, or die base, is the component on a press brake that supports, positions, and locks the lower tooling (dies) in place.
It is a critical part of the machine because it ensures the die stays aligned, stable, and secure during bending.
Guide Rails: Guide rails are designed to guide and support the movement of the upper ram of the press brake. They ensure that the ram moves along a precise path during operation, preventing any deviations that might affect the bending accuracy.
Positioning Devices: Positioning devices, such as back gauges or front gauges, are used to accurately position the workpiece before the bending operation begins. These devices ensure that the material is correctly aligned with the die, allowing for precise and repeatable bends.
2.Press Brake Tool System Types
2.1 American (Amada) Style
Main features:Most common in North America,Simple, strong, and lower cost,Fast tool changes with segmented tools,Less precise than European/Wila style
The American Tooling System is synonymous with rapid setup and user-friendly operation. Characterized by a self-seating groove mechanism, this style of tooling ensures quick and hassle-free punch installation.With safety clicks facilitating vertical loading and unloading, operators can work with enhanced efficiency and ease. Notably, the absence of a special clamp requirement adds to its convenience, making it an ideal choice for applications demanding swift turnaround times.
2.2 European (Promecam) Style
Main features:Popular in Europe and many modern CNC press brakes,Lightweight and easy to handle,Known for good precision,Wide variety of modular tools
This system typically includes a punch holder that extends for short punches, offering cost-effective force utilization. Although it comes with certain limitations, particularly in terms of compatibility with older press brake models, its affordability and suitability for specific bending tasks make it a viable option for many manufacturers.
2.3 Wila/New Standard Style
Main features:High precision, self-seating,Quick-change clamping systems,Designed for high-end CNC production,Most expensive
Combining the best of both worlds, the New Standard Tooling represents a harmonious blend of traditional and modern press brake technologies. Designed to deliver unparalleled speed, accuracy, and durability, this system offers remarkable versatility in accommodating various bending requirements.Its ability to adjust punch height and leverage advanced features ensures precise results across a wide range of applications. Regarded as the pinnacle of press brake tooling innovation, the New Standard System sets a new benchmark for precision and performance in metal fabrication.
3.Common types of Press Brake Tools
3.1 Punch (Upper Tool)
3.1.1 Straight Punch
A straight punch is a standard punch with a flat surface used for general-purpose bending applications.
3.1.2 Gooseneck punch (for deep flanges)
Also known as a horn punch, the gooseneck punch has a curved or angled tip that allows for bending in tight spaces or reaching difficult-to-access areas.
3.1.3 Acute punch (sharp-angle bends)
A sharp angle punch is specifically designed for creating precise bends at sharp angles, typically used for intricate or detailed workpieces.
3.1.4 Hemming punch
A hemming punch is a specialized press brake upper tool used to create hems,that is, folds where the sheet metal edge is bent over onto itself. Hemming is commonly used for safety edges, strengthening flanges, and improving appearance.
A hemming punch works in two stages:
Stage 1 — Acute Bend (Pre-Hem),The material is bent to about 30°–45° using an acute punch + V-die,This pre-bend reduces stress and prevents cracking.
Stage 2 — Flattening (Hemming),The pre-hemmed material is placed under the hemming punch.The punch then compresses and flattens the material against a hemming die.The result is a tight, flat hem.
3.1.5 Radius punch
A radius punch is a type of press brake upper tool designed with a rounded (radius) nose instead of a sharp, narrow bending tip. It is used when you need to form large-radius bends, protect sensitive materials, or reduce cracking in thick or high-strength sheet metal.
3.2 Die (Lower Tool)
- V-Dies:The most widely used die. Selecting the right V-opening is essential.
- U-Dies:For forming U-shaped channels with consistent width.used with radius punches
- Adjustable V-Die:Allows multiple V-openings in one tool—very efficient for setups.
- Hemming Die:Used with a hemming punch to flatten material.
- Bottoming Dies:Used for bottoming or coining; produces extremely accurate bends.
- Radius Dies:Used with radius punches for bending high-strength materials.
4.Air Bending vs Bottoming vs Coining
Air bending, bottoming, and coining are sheet metal bending processes that differ in pressure, contact, and resulting accuracy.

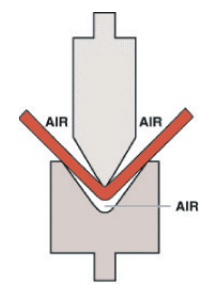
4.1 Air Bending: Flexible and Efficient
How it works: The punch tip presses the material into a V-die without touching the die edges, using only three contact points. The bend angle is determined by how deeply the punch is pressed into the die.
Pros: Requires less force, less wear on tooling, and is very flexible, allowing for multiple bend angles with the same die
Cons: Less accurate due to “spring back” (the material returning to its original shape after the pressure is released).
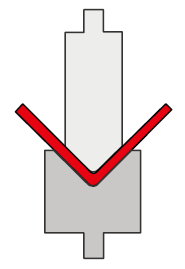
4.2 Bottoming: Greater Accuracy, More Force
How it works: The sheet is forced deeper into the die than in air bending. The result is a more consistent angle, although a small amount of springback, usually around 1° to 2°—can still happen.
Pros: More accurate than air bending.Removes most of the springback.,Results in a more defined and consistent bend.
Cons:Requires more tonnage than air bending.Often requires custom tooling for each angle, which increases tooling costs.Slower setup time compared to air bending.
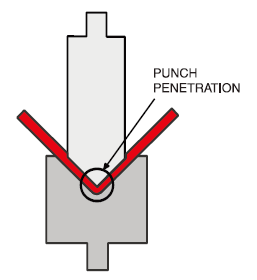
4.3 Coining: Excellent accuracy,repeatability Large force
How it works: A much higher tonnage is used to press the material into the die, causing the metal to conform tightly to the die’s shape.
Pros:Highest level of precision and accuracy,Eliminates spring back and produces a very consistent bend.
Cons:Requires a very large amount of tonnage (up to 30 times more than air bending),Causes significant tooling wear because of the high pressure,May require custom tooling for each angle.
5.How to Choose the Right V-Opening (V-Die Size)
To choose the right V-opening (V-die size), use the “Rule of Eight,” which suggests the V-opening should be eight times the material’s thickness. However, this is a starting point, and it’s best to use a press brake bending chart specific to your machine for precise recommendations. When a precise match isn’t available, round up to the next closest die size.
- Start with the Rule of Eight: A general rule is to use a V-opening that is eight times the thickness of the material you are bending (e.g., for 1/8-inch steel use 1-inch V die)
- Consult a bending chart: The most accurate way is to use a press brake bending chart, often available from the machine manufacturer or online. These charts account for various material types and thicknesses.
- Consider material thickness and type:For mild steel up to (1/2) inch thick, the rule of eight is a good guide line.For thicker mild steel, you may need a larger V-opening (up to 10 times the thickness) to prevent cracking.Softer metals like aluminum may require a gentler setup to avoid marks.
- Choose the correct die size: If the calculated V-opening is between available die sizes, round up to the next closest option to ensure proper bending.
- Understand other factors: A smaller V-opening will require more bending force and can cause more tool wear. The V-opening also affects the final bend radius and the minimum leg length you can form. such as the radius of the bend. Air bending mild steel with a V-die will form an inside radius around 16% of the opening, so a smaller V-die than prescribed by the Rule of Eight would be necessary for bends requiring a radius tighter than that percentage. Flange length is also a consideration, since the minimum flange that can be formed is around 77% of the size of the V-die. For a shorter flange, changing to a smaller V-die will be necessary.
6.Tooling Materials
6.1 C45 (1045) – Basic, Low-Cost Tool Material
Best for: Mild steel,Light production,Air bending with low tonnage,Shops with lower budget
Pros:Cheapest tooling material,Easy to machine and replace
Cons:Low hardness → wears quickly,Not good for stainless or abrasive materials,Not suitable for coining or heavy loads
When use C45: You run basic jobs, mild steel, and low-volume production.
6.2 42CrMo / 4140 – Most Common & Versatile (Industry Standard)
Best for: General fabrication,Mild steel & stainless steel,Most CNC press brake operations,Medium-to-high production
Pros: Good strength and toughness,Better wear resistance than C45,Suitable for most bending jobs,Affordable with long lifespan
Cons: Not hard enough for heavy coining,May still mark stainless without protection
When use 42CrMo: You need strong, durable tools for daily use on mild steel and stainless.
6.3 H13 Tool Steel – For High Tonnage & Coining
Best for: Coining,Bottoming,Stainless steel production,Thick plate bending,High-strength steel,Long-run, high-wear applications
Pros: Extremely high hardness (48–52 HRC),Heat-resistant,Longest life among steel tooling,Holds sharp geometry and precision
Cons: More expensive,Not necessary for simple air-bending jobs
When use H13: You run heavy production, coining, or bend stainless / high-strength steel regularly.
6.4 Tungsten Carbide – Ultra Precision (Premium Tooling)
Best for: High-end precision forming,Scratch-free stainless steel,Automotive / aerospace,Ultra-long production runs very thin materials requiring perfect surface finish
Pros: Extremely hard (90+ HRA),Zero deformation,Lowest friction → no marking bend,Ideal for automated high-speed bending
Cons: Very expensive,Brittle if misused,Requires experienced operators
When use Tungsten Carbide: Accuracy and surface quality are more important than cost
7.Tooling Surface Treatments (Coatings)
Many tools receive additional coatings for better performance.Surface treatments/coatings are used when the base tool steel alone is not enough to handle wear, friction, galling, or certain production conditions.

Black Oxide
- Nitriding: Hardens the surface,Increases wear resistance,Adds lubricity,Ideal for stainless steel jobs
- Black Oxide: Corrosion resistance,Basic protection (cosmetic)
- PVD Coating (TiN, TiCN, TiAlN): Very hard surface coating,Best for high-volume stainless or HSLA steel,Reduces marking and galling
- Urethane Film (Die Protection): Used on top of V-diesPrevents scratches on stainless and aluminum
8.How to properly maintain press brake tooling

8.1 Daily maintenance steps for press brake tools
8.1.1 Clean your tools regularly
The correct way to keep press brake tooling clean and free of rust and corrosion is to apply the following steps:
- Apply mold maintenance wax or maintenance oil to the tools, or apply it to an industrial scouring pad. It is very important to choose a scouring pad with moderate hardness and softness, because a scouring pad that is too soft may not be able to completely wipe the mold clean, and a scouring pad that is too hard may leave scratches on the mold.
- The operator should wear gloves and hold the scouring pad to wipe along the height direction of the mold. When wiping, pay attention to only wiping in one direction, not rubbing back and forth, so as not to damage the mold surface.
- After maintenance, wipe the maintenance wax or maintenance oil on the mold surface with a rag to ensure that the mold surface is clean and free of residue.
- If there is no rust stain on the mold surface, you can spray the maintenance wax on the rag and then wipe the mold surface with the rag. This can prevent excessive maintenance wax from directly contacting the mold and keep the mold surface clean.
- In the case of high air humidity or frequent use of the mold, it is recommended to perform maintenance every two days. On the contrary, in a dry environment or when the frequency of use is low, it can be maintained once a week. This flexible maintenance frequency can be adjusted according to actual conditions to ensure that the mold is always in good condition.
Taking these steps will not only keep your tooling clean and free of rust and corrosion, but will also protect the laser marking that contains all of the important technical data that is used to identify it and make it possible to load it into the control on your press brake.
8.1.2 Implementing a Tool Storage System
Investing in a dedicated press brake tool cabinet is an important measure for tool maintenance. Storing bending machine tools on ordinary shelves exposes them to dust and debris, increasing the likelihood of damage. Furthermore, ordinary shelves do not provide adequate protection, leaving tools vulnerable to environmental factors.

While handcrafted wooden cabinets can provide individual storage compartments for each bending machine tool, the moisture in the wood itself accelerates rust and corrosion. Therefore, handcrafted wooden cabinets are not an ideal choice.
Tool cabinets that store press brake tools horizontally and are separated by metal partitions are also not the best choice because the metal partitions may cause the tools to move when opening and closing drawers and placing punches and dies in and out of the cabinet, resulting in potential damage to the working surface of the tools.
Experience has demonstrated that storing tools vertically in a press brake tool cabinet with individual tool slots using nylon, neoprene or polyurethane pads is the best way to store tools. This methods not only provide the maximum amount of protection from potential damage. but also store tools in an orderly manner, And finally, a good tooling cabinet will come with lockable drawers to protect your investment and to keep your tooling from being moved away from its intended location.
8.2 Things to note in bending work
8.2.1 Inspect Tools Before Use
Check for:
Cracks,Chipped edges,Wear grooves,Rounded punch tips,Damaged die shoulders,Burrs or rust spots
8.2.2 Clean the lower die groove and test
Before starting the bending machine, metal filings must be removed from the lower die groove. This is to prevent metal filings from damaging the die and work piece during the bending process. Meanwhile, before the formal bending, be sure to test to ensure that the equipment and mold are operating normally and check for potential problems.
8.2.3 Control the mold pressure
During the bending process, the downward pressure of the mold cannot exceed the bending critical point of the mold. If the pressure is too high, the mold may deform or even break. Therefore, the operator should reasonably adjust the pressure according to the material and thickness of the workpiece to ensure that the mold works within a safe range.
8.2.4 Choose the appropriate lower die groove size
When bending, the size of the lower die groove should be appropriate. A lower die groove that is too large or too small will affect the bending effect. An overly large lower die groove may cause inaccurate bending angles, while an overly small lower die groove may cause damage to the workpiece or wear of the mold. Therefore, the appropriate size of the lower die groove should be selected according to the specific size and requirements of the workpiece.